The integrated motor end cover and gearbox die-casting packs strength and efficiency, but its raw IT10 precision falls short of the IT6 needed for bearing bores and mounting lips. This follow-up dives into the post-processing of this aluminum alloy casting (Figure 7), tackling its quirky shape and orthogonal bores with a milling fixture that’s accurate, sturdy, and flips like a pro.

Problem: Precision vs. Complexity
This casting—end cover fused with a gearbox—handles a worm shaft dropping 960 RPM to 60 RPM via a turbine. But its irregular shape and two perpendicular bearing bores (30 mm diameter, 9 mm deep) posed headaches:
- Precision Gap: Die-casting hit IT10; bearings and lips needed IT6.
- Orthogonal Bores: Lathe setups couldn’t cut both in one go—multiple clamps killed perpendicularity.
- Thin-Wall Woes: Clamping risked warping the delicate frame.
The complexity clashed with tight tolerances—standard machining wouldn’t cut it.
Approach: Milling and Fixture Blueprint
To bridge the gap, the team pivoted to milling with a custom fixture:
- Process Pick: Weigh lathe vs. mill for best fit.
- Fixture Focus: Lock in positioning and clamping without distortion.
- Flip Factor: Nail two bores in one setup.
The aim? A fixture that’s simple, precise, and gets the job done fast.
Methods: Milling Mastery Unleashed
The Milling Plan
With 0.5 mm left for machining, milling on a vertical center took the lead:
- End Cover: Lip goes from 98.5 mm to 99±0.025 mm; bore from 29.5 mm (8.5 mm deep) to 30±0.025 mm (9 mm deep).
- Gearbox: Bore matches the end cover specs.
Lathes flunked—two setups tanked accuracy. Milling with a fixture aced it in one.
Fixture Breakdown
The fixture (Figure 8) features a clamp body, base, pivot shaft, pins, and swiveling clamps:
- Positioning: Two 5 mm mounting holes snag a round pin and a diamond pin, locking rotation.
- Clamping: Swivel blocks with screws and springs secure the part; they flip to cooling slots for release.
- Flipping: The clamp body pivots 0°-90° on a 60±0.012 mm shaft, locked by a base screw and washer.
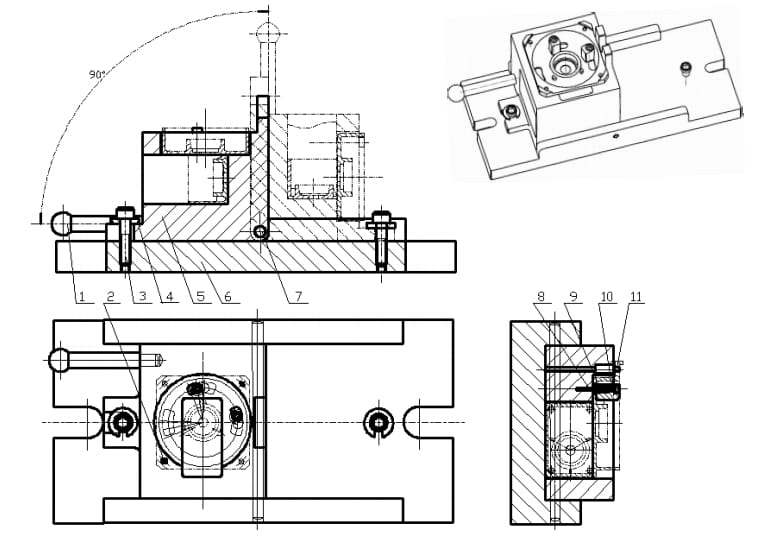
Alt: Milling fixture for die-cast motor end cover and gearbox
How It Runs
- Lock It: Slot a washer, tighten the base screw—clamp’s set.
- Clamp Up: Slip the casting onto pins, swivel blocks in, tighten screws.
- Mill End Cover: At 0°, cut the lip and bore.
- Flip and Mill: Loosen, pivot to 90°, relock—hit the gearbox bore.
- Pop Off: Loosen blocks, swing to slots, lift free.
Wire EDM ensures the shaft hole’s 80-0.05 mm precision, keeping flips spot-on.
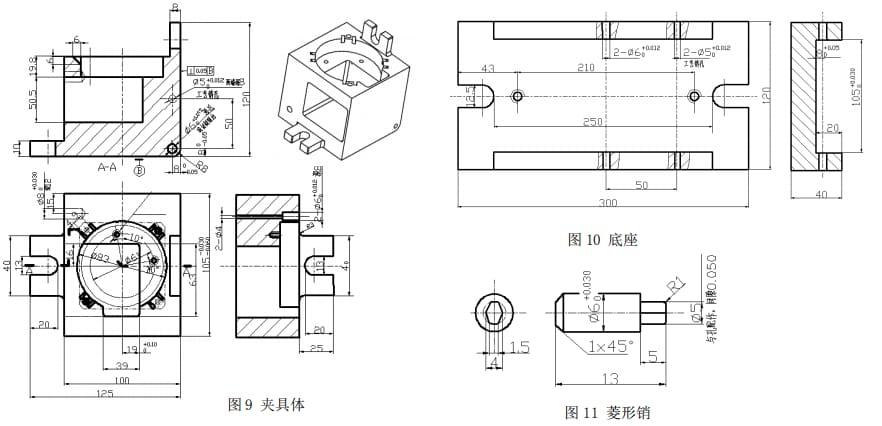
Alt: Milling fixture processing orthogonal bores on die-cast part
Standout Features
- Pin Power: Two-pin setup leverages casting consistency, dodging deformation.
- 90° Flip: One clamp, two bores—perpendicularity stays under 0.05 mm.
- Quick Tricks: Washers and springs speed swaps without fuss.
Why It Works
The fixture’s flip nails orthogonal cuts without re-clamping. Precision grinding and EDM keep the pivot true, while gentle clamping protects thin walls. It’s elegant and effective.
Conclusion: Precision, Meet Efficiency
This milling fixture lifts the die-cast part from IT10 to IT6, nailing bearing and lip specs with one setup. Its smart pins and swivel design conquer complexity, offering a slick fix for post-processing intricate castings. Curious about how this part starts life? Read “Mold Design for Integrated Motor End Cover and Gearbox Die-Casting” to see the mold magic behind it.
Key Specs Table
| Feature | Detail |
|---|---|
| Raw Precision | IT10 |
| Target Precision | IT6 |
| Bore Size | 30±0.025 mm, 9 mm deep |
| Lip Size | 99±0.025 mm |
| Flip Angle | 0°-90° |